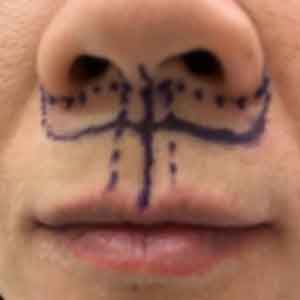
Lip lift pre-op markings – Cosmeticsurg

Ricardo L Rodriguez MD
A Lip lift is a plastic surgery procedure that shortens the distance between the top border of the upper lip and the bottom (base) of the nose. It creates a fuller, younger looking top lip by increasing the amount of “pink lip” and better exposing teeth when smiling and speaking.
The Lip lift will result in a more pleasing appearance to the face. Look at the ‘before and after’ photo above and you can see that the patient has a more youthful and pleasant expression following the surgery. A lip lift can indeed even transform your overall expression.
The key to a successful Lip lift are the pre-op surgical markings. This post aims to help patients understand what the markings represent.
Skin only Lip lift surgical technique
My lip lift technique involves skin only and does not include manipulation or transection of muscle. I believe that involving the muscle introduces an unnecessary risk of injury to nerves. The ‘skin only’ technique achieves a consistent, dependable, and desirable outcome. In addition, since the procedure involves skin only, there is extremely little risk in changes to how your lips, mouth, and nose move following the surgery.
Over the past few years I have seen a number of patients whose lip lift was performed by other surgeons with techniques involving the muscle. Some of these patients had complications which are difficult to correct. By using the ‘skin only’ technique, I have not encountered these complications. For this reason, I am a firm believer of the ‘skin only’ technique.
Marking Pre-op Lip lift patients

Prior to starting a Lip lift procedure, I spend time with the patient reviewing and discussing the amount of tissue to be removed and the surgical plan.
I use markings to make sure the final result is symmetric, reducing the space between the upper lip and the base of the nose by the same exact amount along the entire length of the upper lip. Based on patient input and our review of the plan, I make surgical markings between the nose and the upper lip as we sit in front of a mirror together.
I use markings to make sure the final result is symmetric.
The markings that I make are fairly detailed. If you don’t know what to expect, it might be a little overwhelming. For this reason I decided to make a short video clip of the surgical markings done on a patient. This patient below was being prepped for an upper lip lift and after completing the surgical plan markings, she graciously allowed me to take this quick video to explain the pre-op markings. Hopefully this video will help patients understand the markings and be more confident that these markings are part of the normal process.
For this particular patient, the surgical plan was to have the final distance from bottom of nose to top of upper lift vermillion (the red part) equal to 1.2 cm.
So there you have an explanation of my pre-op markings for a lip lift!
Learn more about the procedure itself, about my surgical technique, or about how a Lip lift might help you avoid duck lips that can sometimes occur with fillers.
The secret to a successful lip lift is to properly plan the surgery during pre-op and to keep things simple. See our results in the Lip lift gallery!


